The following was written by me for the quarterly magazine of the JCCMI (Joint Committee of Church Music Ireland) in 2002:
The question why does an organ cipher is often asked. It’s not easily answered, although there is always a reason. The easiest way of explaining what can go wrong is to first go over how things work.
In the last article I mentioned that the action can be broadly separated into two principal areas: (a) the communication between the organist and the organ per se, we call this the primary action, and (b) what happens thereafter. In this article we’ll deal partly with (b).
In the majority of organs in Ireland (b) automatically entails slider soundboards. The benefit of this system is that the number of moving parts is kept to a minimum. This will perhaps not be completely clear here, until I get the opportunity to explain other systems.
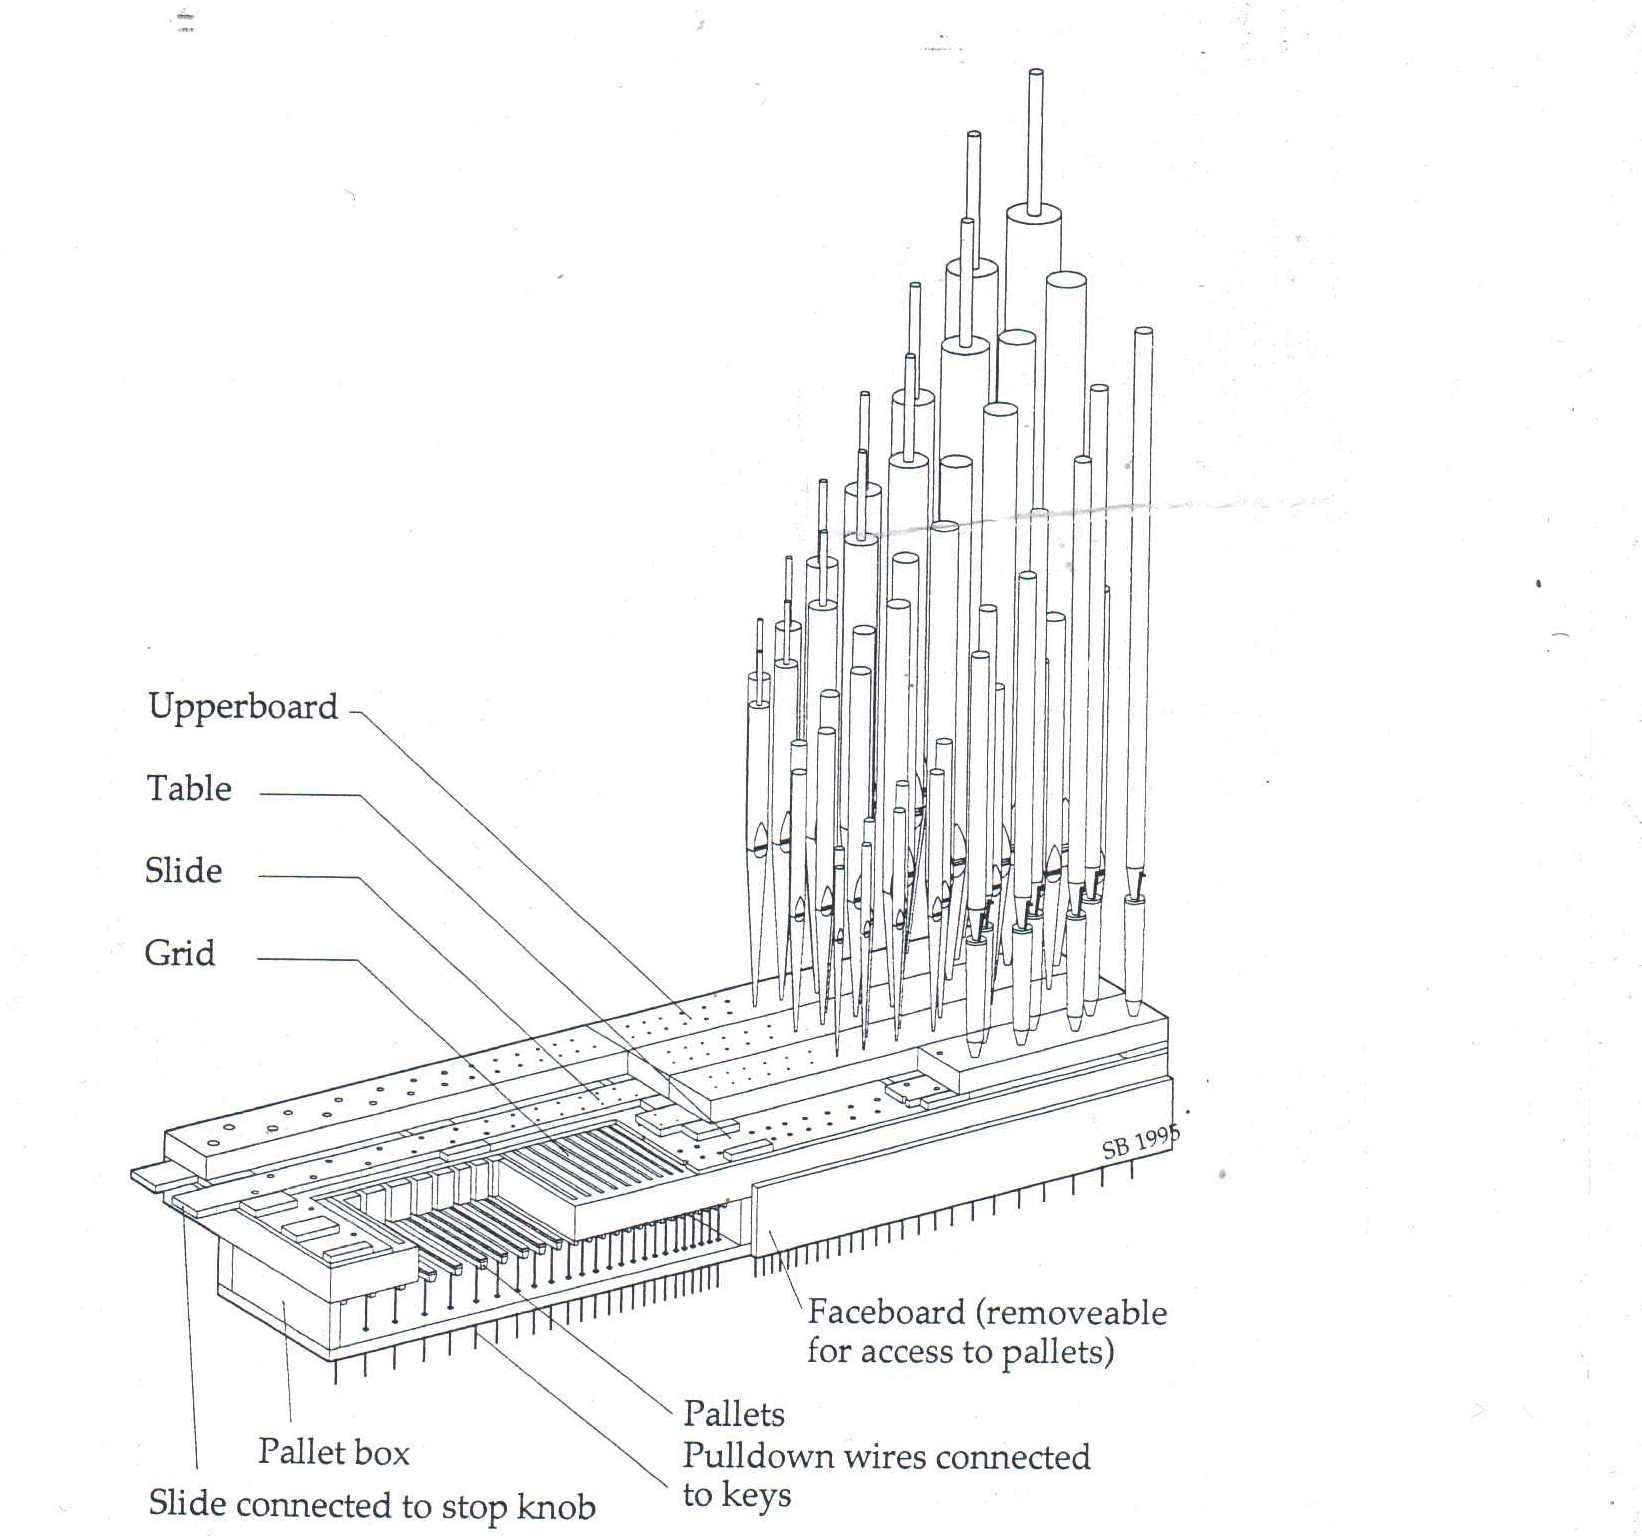
Take a look at the sketch (replicated with kind permission from the late Stephen Bicknell, he was a good friend and visited here to check things for me) — it’s a very clear illustration of a slider soundboard. There are two controlling elements to it, receiving two kinds of input from the organist, key action and stop action. Inside the palletbox is pressurised. When a note is played the pulldown wire is pulled, and this opens a pallet. This allows air into the groove (you will see that the grid is assembled like a comb, with grooves travelling the depth of the soundboard). Thereafter, if the holes in the table, slide and upperboard above are in alignment (i.e., one or more stops are on) the air will travel up to a pipe or pipes. It’s very simple and robust. and I hear you ask. what is there to go wrong?
With modern, well-designed soundboards. not much can go wrong. But this is not typical of many organs here, in which most of the soundboards are over a century old. I’ll list the principal problems with these below, but first of all we must appreciate that one small detail is missing from the sketch. Obviously, the slides need to slide, i.e., move so that holes will line up. This means that there must be a slight gap between them and the table / upperboards.
This gap is crucial. Too loose and we have “runnings”. This is when small amounts of air will travel sideways and sound other notes (usually only discreetly) when we don’t wish it. More often than not, some escape of air is acceptable, but it can become disruptive, especially with quieter stops like strings. If we have severe runnings, well, it is a definite hint as to the overall condition of the soundboard itself. If it is severe we will not only have runnings, but the pipes we intend to sound won’t get their full quotient of air owing to air being lost in this same manner.
If the slides are too tight (common in Ireland due to dampness — the timber will swell in conditions of higher humidity) then we have stiff, or jammed stop action. (I’m sure you’ve all witnessed stiff drawstops).
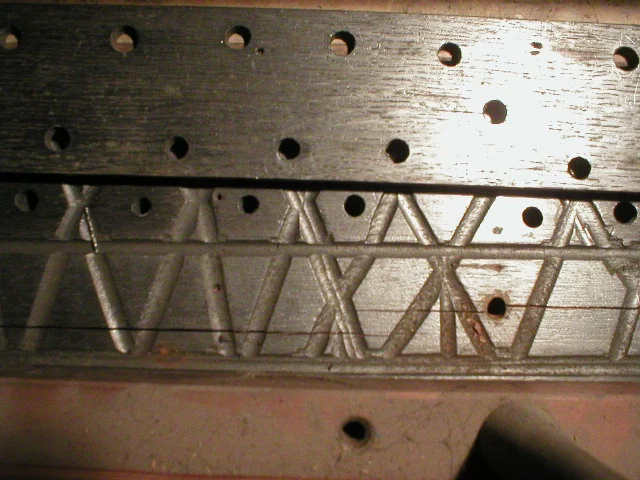
The missing detail from the sketch is the means to alleviate these runnings. It is normal to have deep scoring between the holes, which communicate with similar scoring traveling the length of the soundboard, and this will take excess air to atmosphere and therefore cause no disruption. These scorings would normally be about 3mm deep and allow the inevitable slight leakage an escape. The organbuilder then sets the clearance between table, slide and upperboards to something mechanically satisfactory. This is accomplished by packing up the bearers (usually made from the same material as the slides to ensure similar movement during climatic changes) with paper. So, by design, these soundboards accept a level of imperfection.
Furthermore, this scoring not only relieves excess air around the upperboard area, but also bleed off any slight leaks that may escape through at the pallet (which would otherwise cause whimpers, really small ciphers).
Modern soundboards use a different approach whereby each hole has individual seals fitted on the table and lower side of the upperboard. This prevents air tracking from note to note and has the added attraction of accommodating movement of the timber (a common problem is that components will not stay flat or straight and seals will follow a curved shape more readily). Because seals are so effective, it is necessary to add small bleed holes in the grid (to atmosphere, not to the pressurised palletbox) to allow for slight leaks at the pallets.
The above alludes mostly to possible problems with the stop action end of things. In all older organs all components were made of solid timber that is liable to shrink, swell, warp and (worse) crack.
It would however be remiss of me not point out that runnings and ciphers can also be caused by internal problems with sound- boards. When timber moves in a significant manner it will not only move as mentioned above, but will break internal glue joints. This is animal bone glue, and is brittle. Not only will it fail to glue, but its side effect of sealing outside an actual joint (where it’s forced out during assembly, forming a neat bead) will also be lost.
The main causes of a cipher (if it’s found to be at the soundboard) are:
- Dirt on the pallet preventing it from closing (plaster, a chip of wood, a dead insect).
- A warped pallet, or a warped grid.
- Friction between the pulldown and the hole it travels through.
- The pulldown travelling unusually far (under excited playing) and the pull-down travelling through the hole at a point not usually used, and therefore not accustomed to the polishing effect of being moved up and down.
- The pulldown becoming rusty, causing friction.
- Not shown in the drawing are pins that locate the pallets side/side. If these rust or corrode it will result in friction.
- Bad alignment with the pulldown and/or what pulls them, or the pins.
Soundboards are a mixed bunch. If they’re designed and made properly, and not subjected to unreasonable conditions all will be well. Quite often we experience problems where an old soundboard suddenly gives a lot of trouble, and this can often be traced to the church heating being upgraded, causing the soundboard to almost self-destruct.
More often than not soundboards are arranged so that pipes are laid out in whole tones. This results in an accessible layout, giving the tuner good access to all pipes. It also separates semi-tones from each other, as this frequently causes instability, both in speech and tuning.
End of 2002 article.
The 3 photos that follow are examples from a William Hill organ of how excess heating can ruin a soundboard, showing extensive cracks in the table:


My first soundboard to restore was in 1988, the Great soundboard of Taney Parish Church, Dundrum, Dublin (ex- St. Paul's Church, Bray, Co. Wicklow). It still works perfectly to this day.
Here are a few photos detailing the steps involved in restoring a soundboard to good condition:

Above we can see light showing from behind the plane showing the extent of the dip in the soundboard. Below much the same sort of issue.


Above is the soundboard assembled prior to work on the grid. Below, a slightly blurred photo of a crack in the soundboard table. This will be stopped off with a cocktail stick at either end. Also the area will be made stable prior to the inside of the table (grid) being flooded with glue. This will involve running screws either side of the crack. We use round-head screws (these will be counter-bored so that their heads are well below the surface of the table) as opposed to conter-sunk, as the latter tends to spread the timber.

Prior to flooding however, we make both sides of the grid true and level by shooting as below.

If the shooting is extensive, then we will have to deepen the exhaust grooves as below. The same process will possibly be required to the underside of the upperboards.


The surfaces are then lubricated by lead, suspended in meths. as above & below.


Above can be seen the awful state this soundboard was in - the extent of the bleed holes (inflicted in an attempt to stop whimpering and ciphering) is massive. This was for the organ in St. Mary's Parish Church, Cahir, Co. Tipperary, and I restored it to perfect working condition a few years ago.
Below can be seen the internal of the grid being flooded (or sized). I would usually do every 2nd groove first, letting it dry, and then at a later time return and flood the 2nd grooves. Below you can clearly see where the glue is oozing across into the neighboring groove, thus proving the need for this exercise.
As regards the type of glue - sometimes I use traditional animal (bone) glue, which is applied hot. Other times, where the damage is extensive, I reluctantly opt for modern PVA glue because it will sit thicker, remains somewhat flexible and leaves a more generous meniscus at the sides of the bars. Bone glue is also quite brittle, and I have seen it on a soundboard that spans considerable length, that the sizing actually cracks and fails as the weight of the pipes create a slight bow in the soundboard. (Of course that's something that could be prevented with additional support.)
It's not always necessary to flood, or shoot the surfaces of the soundboard. There are times that a part-restoration is appropriate; it all depends on the condition and history of the soundboard. Full restoration will involve removing quite a bit of material from the thickness of the table, so it can only be done a limited number of times given that the tables are not especially thick (in or around 9mm, almost always mahogany).
Other times, for instance the organ at Clonmel (you can see this elsewhere on the website), it was absolutely necessary. When I first saw the soundboards they were standing on edge in 6" of water!
Surprisingly however, in Clonmel I was able to retain the pallet bedding as there was nothing wrong with it.......by pure luck the pallet-boxes were at the top as the soundboards lay in the water.
Tests sometimes reveal that the grid does not in fact need either shooting or flooding, but perhaps the pallet bedding needs replacing. In this instance it might be necessary to swap the bedding for something more accommodating (a bedding surface of two layers of leather has limited ability to bed in the event that the grid is a little uneven). It all depends on a good visual inspection, testing the grid under wind pressure when stripped down, and experience.


Above, the pallets are refitted with new bedding, and below the new pull-downs are terminated outside the pallet-box in a nice straight line. The 'eyes' are then fitted with leather to prevent metal/metal contact when the trackers get connected.
